Friday, March 23, 2012

Buried treasure

While I was clearing away winter debris in preparation for tilling the kitchen garden yesterday, I noticed some very un-weed-like sprouts poking up from one of the garden beds.

I scooped the dirt away from the base and found this.

The greens in the cold frames won't be ready for a few weeks, so this find was like unearthing buried treasure.

While most of the onions that I'd harvested in the fall have long since been eaten (it was a disappointing harvest), and the rest sprouted (not good storage onions at all) and I'd say only half made it to this size (most were the size of golf balls), this robust specimen overwintered beautifully. I pierced the skin of one and it just dripped with sweet living juice. There were several more like this, too.

I noticed some similar sprouts in the garlic bed, even though I didn't plant any cloves here last fall (the kitchen garden is undergoing a renovation, of sorts). A pack of marauding deer had infiltrated the garden late last summer and in one night of debauchery I lost my lettuce, broccoli, brussels sprouts, sunflowers, leeks and all the tops on my garlic and onions. When it came time to harvest, without the greens to guide me, I didn't know where all the cloves and onions were anymore. I thought I'd harvested all of them. Guess not!

Rather than individual cloves, these are fully-sprouted garlic heads, pearly white and smooth, without their papery overcoats.

While Lucas has little to no interest in growing food (he's all over the eating, though) he loves growing garlic. Or the idea of growing garlic. Me growing garlic. Truth be told, maybe he just loves garlic.

When I showed him my find, he dug up one of the garlic heads, pried away a clove, dusted off the dirt and popped one in his mouth. At first it tasted milder than cured garlic, but then delivered a firey kick.

I haven't yet decided what to do with these -- I think I'll roast then mash them, then smear a thick paste over some crusty bread for a early season homemade garlic treat. In the meantime, I have roughly six heads waiting in a basket in our multi-purpose laundry-bathroom-farmcrap room... and it smells delicious in there; a mix of spring earth, greens and of course, garlic. And to think they call it the stinking rose!

It's funny how this tiny harvest has got my green thumbs (and fingers) even more itchy to sink my hands into the sun-warmed earth and get growing. And to think it's only March!

Foto Friday -- (A) Good morning


Wednesday, March 21, 2012

Tiny interloper

When I went to let the chickens out of the barn this morning I noticed the lid on their feed bin was flipped upside-down. Not too unusual, but then I saw there was a small heaping of detritus accumulated in the centre of the lid, which I first dismissed as a mix of shavings, feathers and other chicken debris (i.e. poop).

Then it moved.

I brushed away some of the debris, took a closer look and this is what I found.

A small salamander covered in crud... and kitty litter.

How this tiny creature got from the kitty litter, which is in a separate room, to the top of the chickens' feed bin is completely beyond me.

Even more amazing is that she got past the chickens. (Those hens are fierce carnivores, given half the chance.)

I washed her off and at first I though she was a blue spotted salamander.

On closer inspection, I'm wondering if it's a Jefferson salamander,which is currently listed as "Threatened" under both provincial and federal wildlife acts.

Jeffersons have especially long toes and can release an ooze-like substance when threatened.

This one was certainly sticky as I tried to rinse her off and just look at those toes!

But it does seem somewhat out of its usual range. Most Jeffersons are concentrated in southwestern Ontario, around the southern portion of the Niagara Escarpment and the western portion of the Oak Ridges Moraine. (For all your non-Ontarians, that's about three to four hours west of here.)

Regardless of what kind of salamander she is, I'll keep her only until the kids get home from school so they can help me re-home her -- on the edge of the woodland, close to the stream and ponds, amongst the leaf litter. At least that's where I think she'll go, though I'm not up on the the standard 'endangered salamander release protocol'. Google is no help either.

Unfortunately if it is a Jefferson, they're quite particular about their habitat, which is why they're under threat -- largely due to habitat loss and degradation due to urban development. They don't typically travel far from their birthplace, which makes this barn discovery even more odd. Stranger yet, this isn't a fluke discovery -- each spring I find a one or two salamanders in the barn, which is nowhere near the woodland or the wetland. However, the well that feeds our barn is down by the pond, so perhaps they make their way up through the drain.

It's all a big mystery and I hope this wee creature takes to its new home. But then again, anyplace is better than living in the chicken coop!

* * *
After school photo update:


Bye bye, salamander. Good luck and stand away from the chickens!

Sharing a great idea -- homemade soil blocks

One of the joys of blogging isn't only in the writing, but in the reading. I've learned loads (and found much inspiration) simply by reading other people's blogs. Annie's Kitchen Garden blog is no exception.

In today's post Granny shared a tutorial on homemade soil blocks, which I, in turn, wanted to share with you.


It's such a simple idea, and yet one that I would never have come up with myself. My brain just isn't wired that way.

In Eliot Coleman's book "The New Organic Gardener", he devotes an entire chapter to soil blocks, which are pretty much what the name implies -- a block of lightly compressed potting mix with a small preformed indentation for the seed.


There are several advantages to soil blocks. The blocks are both the container and the growing medium, so you don't need to bother with pots and plastic. You can adjust the block size for any seed, and even transplant blocks into one another when it comes time to pot up you seedlings. When transplanted to the field, the seedling becomes quickly established.

The downside is the upfront price. Johnny's Selected Seeds sells them starting at US$25. A Canadian company (SoilBlockers.ca) sells their mini blocker for $25 and a medium four or five blocker for $30. I get that it's one-time investment, but it can add up.

I've been reusing a motley assortment of pots and flats for my seed starting, but I might try Granny's so-smart, low cost idea for making blockers out of medicine bottles, drawer pulls and assorted hardware. Thanks, Granny!

What do you use for seed starting?

Tuesday, March 20, 2012

Welcome, spring!

"The flowers of late winter and early spring occupy places in our hearts
well out of proportion to their size."

~ Gertrude S. Wister, horticulturalist (1905 - 1999)

May your lives and gardens be blessed with abundance
and may today bring forth joyful beginnings.
Happy first day of spring!

Monday, March 19, 2012

Luuk hat is done!

I finally finished Ella's Luuk hat. It was one of those project that was supposed to be quick and easy that morphed into a miserable mess of wonky pink loops and mismatched twists. Each time I got to the decrease, I had to rip it back -- and I did this four times. Seriously? It's not even like this was an intarsia or Fair Isle knit project. It's a simple hat, for pity's sake.

This project sat stewing in my knitting basket for almost a month (OK, maybe the hat wasn't stewing, but I certainly was) until on Saturday night when Ella said to me, "Mama, I hope you finish my hat before I go back to school on Monday." (The kids have been off since March 9th for their school break.)

Then Jack said, "Of course she will, Ella."

Two hours later and the hat was done. Notes to self: 1.) don't knit while half asleep and, 2.) read the pattern.

I'm thrilled with the result. I think my girl is too.

She didn't want any embellishments on the top (the pattern calls for a wee bobble), so I finished it very simply. (You can find the Ravelry pattern here.)

It has a lovely snug fit and covers her ears nicely, which will be great when the cold weather returns.

Granted it's been 20 degrees Celsius the last two days, so the hat didn't stay on her head long.

However she did wear it to school this morning. Of course she did.

Saturday, March 17, 2012

Backyard sugaring (or how to make maple syrup)

Disclaimer: I realize the title is a bit misleading because this is simply how we made maple syrup from five trees using low-tech methods.

As this is our first year making maple syrup we wanted to do things on the cheap, so our only investment was in traditional buckets and spiles, which cost about $30 (though we could have used recycled plastic buckets had we wanted to). We chose the iconic lidded metal buckets because 1.) I prefer metal to plastic, 2.) we can use them year after year, and 3.) I like the look of them. When I close my eyes and picture a sugar bush, this is what I see.

A bit of nostalgia? Perhaps. But as we're tapping only a handful of trees, collecting buckets is easy and manageable. Even the children enjoy this chore, racing to each tree, lifting the lid off the bucket and tipping the clear contents into the waiting pail below. (We used food-grade wine-making pails that we found in the barn.)

Five almost-full sap buckets nearly fills three 20 litre pails, which can fit side-by-side on a kids' sled (that I can drag when there is snow) or on the back of the ATV (when there is not). The hard part isn't getting the sap out of the trees or the sap into the gathering pails -- it's getting the pails out of the woods, which can be made downright treacherous by the weather (think mud sucking trails laced with patches of ice).


Next year when we tap more trees (we're thinking 10) this bucket method will still be manageable, though instead of the small wine buckets, we'd use a much larger gathering pail that we'd pull by tractor. Still I can appreciate why a growing number of producers, home-scale and commercial, are switching to plastic tubing pipeline systems, which move the sap via tubes that are connected to a centralized collection "vat" in or near the sugar shack.

Sandy Flat Sugar Bush, Warworth, Ont. March 2010

This is certainly a more efficient collection method, but it is more expensive to purchase up-front, more time consuming to set up and can require ongoing maintenance due to squirrel damage. What's more, something of the sugar bush lore and romance is lost when the trees look like they're connected to an elaborate IV.

As we're simply interested in making maple syrup for our own consumption, I quite like the slow and simple process of gathering buckets. Much of our traditional ways have been lost in the quest for greater efficiency, and while we may be able to harvest more sap for less time and effort by using more "advanced" technology, the experience and link to tradition would be lost.

Source: Little House in the Big Woods by Laura Ingalls Wilder

In keeping with our low-tech, minimal cost approach, we, too, decided to boil the sap down over an open fire. Larger hobbyists and commercial producers use evaporators, but even a small evaporator for up to 150 spiles would set us back $3,000.

We didn't have a big iron kettle like the pioneers used, so instead I built a rough three-sided "oven" out of cinder blocks in our fire pit and topped it with an old grate. Lucas found a stainless steel stock pot on sale ($13) and we used that for our main boiling pot. (I think it's only a 12 quart size and while a larger pot or shallow pan might have been better, we wanted to make use of what we had or was readily available.)

I had a second pot (not shown) that I used to pre-boil the sap, so as the larger pot boiled down, I added the pre-boiled sap to it to keep the temperature fairly constant (unless the sap in the larger pot threatened to boil over and then I'd add cold sap to cool it off).


I didn't need to sit there the entire time, but I did enjoy several hours of quiet contemplation at the fireside watching the steam billow and the sap dance over the glowing coals as the fire hissed and crackled. Pure magic.

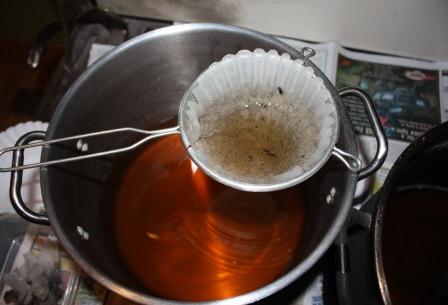
It took about seven hours to boil roughly 55 litres of clear sap down to 4-5 litres of thin golden syrup. At that point, I brought the sap into the house (while it was still hot) and filtered it into another stainless steel stock pot. While I'd already filtered the sap once in the woods, to remove the bugs and pieces of bark, quite a lot of particulate matter (from ash, cinders, etc.) had collected in the boiling sap. It's also wise to remove the gritty sediment called 'sugar sand' (or niter), which is minerals and nutrients from the trees that concentrates as the sap boils down.

I then put the remaining sap on the stove top to finish it. As I'd already boiled most of the water off outside, I didn't need to worry too much about excess condensation in the house (as sap is only 3 - 5% sugar and the rest water, sugaring inside the house can peel wallpaper and invite mould into the walls), but I used the vent fan all the same.

Finished sap boils at approximately 103.8 degrees Celsius (218.8 degrees Fahrenheit) (at sea level). It's important to keep an eye on the sap/syrup as you approach this point because as the concentration of sugar increases, less water is available to boil away, which means the syrup can easily boil over and/or burn.

If you let it boil too long as I did with our first batch, it'll start to thicken and crystallize. (Ironically, this happened as Lucas and I were arguing over whether the sap/syrup was ready yet. Guess he was right.)


The above syrup has a creamy consistency flecked with granulated maple sugar bits and is delicious in coffee, drizzled on ice cream, smeared on toast, eaten by the spoonful...

I was much more careful with the second batch and while I didn't have a candy thermometer handy (I broke it with the first batch) or a hydrometer to check the density of the maple (finished syrup is roughly 65% sugar) I'd say this one turned out perfect -- deep amber in colour with a smokey rich sweetness.

Sugaring season is short, with most sap coming during a 10 to 14 day "run," depending on the weather. We'll continue to collect sap and make syrup until the buds open and the trees stop producing. With this strange spring, that may come sooner than we hope.

Like many of our "simpler" pursuits, there is a lot of time and work involved transforming sap into syrup, especially when making it the traditional way. But this process fosters a deep appreciation for the gift that nature provides us and helps create a connection to the folks who settled our land and had their own sugaring-off celebrations. If these trees could talk, I'm sure they'd have many sweet stories to tell. Instead, we're sharing our own.

Bloom

Sunday, March 11, 2012

Seedy Sunday

Saturday, March 10, 2012

The view from here


Friday, March 9, 2012

Full

With the balmy weather this week, the maple sap has been flowing like mad. When I went to check the trees yesterday, all five buckets were full like this. It took me two trips to haul it all out of the sugar bush.

We've got more than 50 litres of sap already, so I'll start boiling it down today outside over an open fire.

On Wednesday I was hanging out with the bees; today I'm making maple syrup. When the work and school day is done, my family will join me to roast marshmallows around the fire.

This kind of living offers as many challenges as it does joys, and there are days I feel tired and spent and overwhelmed. Then there are days like today when I feel so full -- full of gratitude and love for my life.

The (real) Bee Movie


If you're having trouble with this clip, you can watch it at YouTube here.

Wednesday, March 7, 2012

First reunion with the bees

"The appeal of beekeeping is that the bees let you witness all their miracles"
~ Holley Bishop, author of "Robbing the Bees"

I've been visiting the beeyard the last few weeks hoping for some sign of activity, but except for a few lone bees that emerged when we checked the weight of the hives (when you lift the back end a heavy-ish hive suggests that the bees have enough foodstocks to make it through to spring) there was disappointing quiet. I feared that we'd lost our bees to the cold, mites or starvation.

But when I visited the beeyard today, it was just teeming with life.


The bees have been clustered tightly in their hives since the weather turned cold and stayed cold late last November. But with today's balmy 15 degree Celsius temperatures, they decided to venture out for their cleansing flight. (That's a polite way of saying they come out of the hive to poop. That's a good thing, because poop in the hive is an indicator of sick bees.)

I've been thinking a lot about these wee creatures lately. It's been a mild winter, but as this is our first year overwintering bees, I wasn't sure what to expect. But then again, even the most experienced beekeepers can't predict what'll happen with the bees this year -- or any year really.

To say I was overjoyed when I saw that both colonies have made it this far (though one is much stronger than the other) is a vast understatement. In the short time that I've been keeping bees, I've fallen hard for these tiny, mesmerizing, industrious beings. I'd say I'm smitten.


The saying "to be busy like a bee" is something of a disservice to bees, because no human is ever as busy as a bee. Their entire reason for being is built on service -- to their queen, to each other and for the betterment of their colony. Even today the bees were working at getting ready for new spring brood, by dragging all the winter debris and dead bees out of the hives. Such drama.


The weather is supposed to turn cold again over the next few days and the bees will most likely hole up in their hives until the flowers and trees start to blossom and they can once again forage for first nectar and early pollen.

I look forward to our next reunion, though it's by no means assured. It's a dangerous time for bees. Their winter stores need to last until they can forage again. At first blush, beekeeping seems like a straightforward practice, but it's hard work keeping bees alive -- and it's worth it.

I still have so much to learn from the bees and I'm just getting acquainted with their magic, but already they've provided a glimpse into the wondrous and complex web of nature that surrounds me. Then there's the honey -- truly the best I've ever tasted. Such a gift.

As Bishop writes in her book about her six-year journey as a beekeeper: "My sense of wonder, admiration, and respect for the bees has deepened and matured. They have sweetened my life in so many ways. Beekeeping is an endlessly satisfying passion, education and reward. Looking at the snowy winter hives, I wonder what new lessons, treasures and flavours the bees will bring me in the spring. I know that if I take care of them, they'll take care of me."

Tuesday, March 6, 2012

Why small farms matter

I just finished writing my "Editor's Message" for a farming publication that I, uh, edit, and I thought I'd share it here simply because I think the message is important. I also think that everyone should go see this new film...
* * *
I recently saw a new documentary "To Make a Farm” by filmmaker Steve Suderman. It follows five young people through a year growing food and raising animals on their small-scale CSA farms.

It’s a beautiful feel-good film and I was moved, uplifted and inspired by the passion, dedication and drive of these new(ish) farmers to grow food, steward the land and connect with their communities despite challenges that would test the most seasoned farmers.

After the film there was a brief Q&A with Suderman and two local farmers. While the consensus was that the film was both cinematically beautiful and inspiring, a few audience members dismissed these farmers as “romantic idealists” -- while it was great that these “city folk” wanted to move to the country, farm and save the world, could it make a difference on such a small scale? Was it realistic? Was it enough?

I didn’t respond at the time but on the drive home I ruminated about what I wish I’d said. And here it is:

Passion and idealism drive many people to their profession, be it doctors who want to save lives or lawyers who want to right wrongs or teachers who want to enrich children’s minds -- why must it be different for farmers?

While coming from a long line of farmers, or growing up on a farm, has its advantages, I don’t think either is a prerequisite for farming. Farming isn’t a birthright, it’s a choice, and the fact that city folk are deliberately choosing this life is something to be celebrated. In fact, it’s young farmers who are essential to the future of agriculture. Even if idealism brought them to the land, it’s clear-sighted realism about the benefits (and costs) of this life that enables them to stay there.

Yes, small-scale farming is physically demanding. It’s work that tests the body, mind and spirit. But as Wendell Berry writes, “We must learn to think of human energy, our energy, not as something to be saved, but as something to be used and to be enjoyed in use. We must understand that our strength is, first of all, strength of body, and that this strength cannot thrive except in useful, decent, satisfying, comely work.”

Farming is filled with risk and uncertainty, but it’s also transformative and joyful. (Ed note: I referred readers to two stories in the magazine that don't have much relevance here, so this sentence was actually much more interesting and relevant that it sounds.)

I’m not saying small farms are the solution to the complex challenges we face related to agriculture and food production, but they are one solution -- and one that shouldn’t be dismissed solely on scale.

So to those skeptics in the movie theatre, I’d say that for the local communities that are savouring the food grown by these farmers, for the land and animals that thrive under their care, and for the future farmers who are inspired to follow a similar path, “It’s enough.”

photo credit: Tarrah Young of Green Being Farm

Saturday, March 3, 2012

Drip...


Enough of these for a collection of nine-and-a-half litres today,
and that was with two buckets (out of five) downed from a massive windstorm.

Man, I freakin' LOVE this!
Related Posts with Thumbnails